30 June 2008

Automatically switching on the firewall by location on Mac OS X

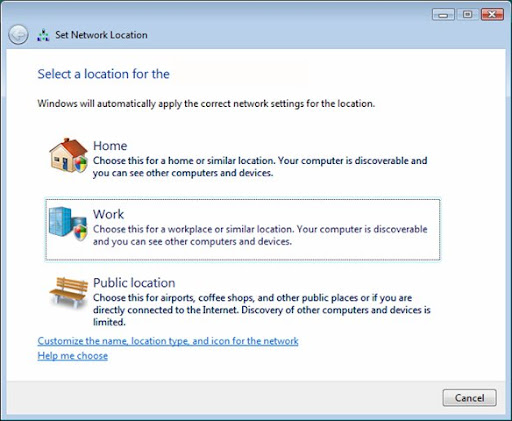
There is something that Windows Vista actually does rather well. When you connect to a network to which you have not previously connected, Vista will prompt you to say whether it is Home, Work or Public. Naturally when you connect to some sort of unencrypted network at a Cafe, University or wherever you are going to want to select Public - basically this puts the firewall up to full strength to stop services like file and printer sharing from telling the world what it is you have on your laptop. (I'm simplifying things here - if you unblock services while Public for example you could still be opening yourself to a world of pain because it will be unblocked for all public places).
I assume people are mostly still using XP because it seems no matter where I go in public (well maybe not everywhere) there's someone who has neglected to lock down their system, even to the extent that they have write access open to their OS / data partition.

Mac OS X doesn't seem to have this feature at all. Yes, it has network locations but they don't cover the firewall, nor can they be set to automatically switch. But there is a way.

First, we need to do how to programmatically change the network settings. The answer comes from (the really rather useful) macosxhints.com.

sudo defaults write /Library/Preferences/com.apple.alf globalstate -int 1
The last value represents the state of the firewall, where:
  • 0 = off
  • 1 = on for specific services
  • 2 = on for essential services
Note that actually the 'sudo' isn't required for this if you have an administrator account. So I created two very simple shell scripts based on this command, one which turns on the firewall and one which turns it off.

The second part of this is the great MarcoPolo. In a nutshell, MarcoPolo can automatically do whatever you want whenever you want based on various physical attributes like the Wifi access points it can see, bluetooth devices and even ambient light (among other things). Unfortunately it hasn't been properly updated for Leopard, so it can't switch the firewall itself - but it can be set to run shell scripts.

So this is what I have going. When I'm at home, MarcoPolo automatically sees my home WiFi and switches the firewall into a low paranoia state (so I can access my files etc). When I leave home, MarcoPolo battens down the hatches to prepare me from those people interested in my SSH, my files or my Apache server.

It's a great thing really - but it should be easier. Here's hoping Apple considers some sort of Vista style automatic switching at some stage.

05 May 2008

Democratic Delegate Counter

CNN has a rather interesting delegate counter for the democratic nomination race on their site. It's quite fun to play with the sliders and see what's going on at the moment.

There are problems though. It's written in Flash - nothing wrong with that in theory but the Flash seems to be referencing a bunch of non existent variables - all I get is a page full of NaN and undefined (except sometimes).

Anyway, instead I thought I'd create my own (requires javascript; opens in a new window):

Click here

Sure, it doesn't have a map and the sliders aren't as fancy but yes, it works in every browser.

Some notes:
- Use the editable text boxes to change the current number of delegates / superdelegates who are pledged.
- You may find you need to adjust a slider (any slider) to get new calculations after you manually update one of the text boxes.
- Works in all modern browsers (that I've tested!)
- Let me know of any bugs (and if I can be bothered I'll fix them).

22 March 2008

Using Unsion to sync iTunes


Update: I accidentally used forward slashes instead of back slashes for the backup dir, preventing the iTunes Library file from being synchonised. I did warn you!

I recently purchased a new Mac laptop to replace my rather aging Ubuntu laptop. Ubuntu's a great operating system but of course the Mac is often considered the best of both worlds. It's got the Unix and (somewhat) open source foundations but it's packaged into a great looking and widely supported interface.

Part of the advantage of this is that many of the most popular software applications are available natively. iTunes, for example, is the app I have been using to manage my music on my Windows machine for years now. Everyone knows iTunes (love it or hate it) but generally it's a great app for managing playlists etc. It sort of works on Ubuntu through Wine but now that I've got the Mac it's native - the same app using the same folder structure on two different computers running two different operating systems.

The obvious next question is why can't these two be in sync? What a pain to have to manage playlists on two separate computers and have to watch as my play counts get further and further apart and podcasts get infinitely downloaded again and again. I've been evaluating solutions to get this working. PowerFolder is a free app that synchronises stuff but it's java and only is really integrated into Windows (by the way even though it's open source they seem to have implemented a stupid 3 folder / 10 GB limit. What? Someone fork that sucker!). At the proprietary end of the spectrum we've got SugarSync. This is a very nice sounding service (which I haven't tried yet - it's brand new) and it has the advantage of storing your stuff online too. But it costs quite a bit, especially for the quantity of stuff I want to sync.

So in the end it's Unix to the rescue! Unison is a tool born in the Unix world that does one thing and does it well - sync! Unison can be used directly on the command line or by creating so called 'profile' files which contain all the information. Here's the profile I've created for iTunes. You only need to create it on one end.


# Synchronise iTunes library
# roots
root = D:/My Music/iTunes
root = ssh://192.168.0.30/Music/iTunes

#Ignore funny mac files
ignore = Name .DS_Store
ignore = Name ._*

# Keep backups of the iTunes library (itl) file
backuplocation = central
backupdir = D:\My Music\iTunes\Library Backup
backup = Name *.itl
backupprefix = $VERSION.
backupsuffix =
maxbackups = 20

# ask no questions
auto = true
batch = true

# favour newer files
times = true
force = newer

# there are a lot of files here so we need it quick
fastcheck = true


I saved this as C:\Documents and Settings\\.unison\itunes.prf and I can run it from my Windows pc by running 'unison itunes'.

Warning! Warning!
So far this seems to work. But I still need to test it. I wouldn't recommend running this yourself until either I've tested it or you've tested it. You have been warned.

Let's step through from the beginning.
We want to synchronise the iTunes music folder on the Windows PC at D:/My Music/iTunes/Library Backup (this is probably different for you. Think C:/Documents and Settings//My Documents/My Music/iTunes/Library Backup). On the mac (which has a static IP of 192.168.0.30 we want to synchonise to ~/Music/iTunes.
We want to ignore those files the Mac likes to store.
We want to keep backups of the itl iTunes Library file - the delicate file that stores everything about your library. I'm going to keep 20 backups because I don't want to lose this. Consider having other backups of your library as well through an external drive or something like Mozy.
We want Unison to run without bothering us with questions.
We want newer versions of files to replace old automatically.
And we want Unsion to compare files by looking at their modified dates. Doing checksums would take a *long* time with so many files. After comparing times and finding a difference, Unison checksums first anyway to be safe.

There are issues though.
- We need to have SSH successfully set up so the PC can talk to the Mac.
- Perhaps we should make sure iTunes is closed at both ends before doing anything.
- It would be good to have an easy way to initiate the sync at either end.
- Automatic sync every few hours or so would be good too.

I'm going to try to work through all of these as I get the time. Stay tuned.

25 February 2008

Mythbox: The mythological cardboard computer


So I got tired of waiting for the computer case which I ordered to arrive for my Mythbox.

Behold instead the cardboard computer! Fully operational with easy access to the power switch. Small risk of fire but otherwise reliable. Could probably do with a few more air holes.

21 February 2008

Mythbox: Software


I remember when I initially considered building a media PC, I had thought that I would base it on Mediaportal. Mediaportal runs on Windows and does pretty much all that you'd want a media center application to do. The only problem with it is that it crashes like hell for me there - I don't want to take the risk for the main TV.

GB-PVR, also for Windows is another very similar, though mush lighter weight contender. I strongly considered GB-PVR, partly for its ability to run on Windows 2000. Plus, it's fairly easy to set up and stable.

Windows Media Center is the other oft-used option. However the limitations here are artificial and infuriating. For example, the way Media Center restricts you to two tuners or that it doesn't support DVB-S natively, nor does it support any HD options outside of the US. This somehow seems unacceptable for such a product. On the plus side, Media Center has probably the best user interface of the bunch.

This leaves MythTV, the relatively stable (if impossibly difficult to configure) usually Linux based DVR software. MythTV sure has the features and it has the advantage of being itself completely free along with the operating system on which it usually runs. I chose mythbuntu as my flavour of choice. Given that cost is my primary driver for this mythbox, I felt that MythTV presented the only real option (all others discussed would have required a Windows license - and product activation on a DVR. That sure doesn't feel right.)

The pros and cons:

MediaPortal

+ Lots of features
+ Itself free and open source
- Requires a Windows license
- A little crash happy

GB-PVR

+ Stable and snappy
+ Nice and lightweight
+ Able to run on Windows 2000
- Requires a Windows license

Windows Media Center

+ Nice, intuitive user interface
+ Relatively easy to set up
+ Media extenders available
- Requires a Windows license, Windows Vista to get newest version
- Stupid tuner number limitations
- Lack of DVB compatibility

MythTV

+ Features galore
+ Highly configurable
+ Relatively stable
+ Completely free
+ Media extenders easy to build or buy
- Hellishly difficult to configure
- Notoriously bad support and documentation

MythTV's definitely got what I need, I'm just hoping I'm up to the set-up task.

18 February 2008

Mythbox: Hardware


When deciding to put my mythbox together I didn't want to spend very much at all. Nor should I have to: I've got components lying around for Africa. I have a bad habit of upgrading my main PC more frequently than is probably necessary (meanwhile my laptop chugs along on 4 or 5 year old technology, I forget how long it's been) and so this means I've got a spare CPU, motherboard and memory and even a 120 GB hard drive.

120 GB isn't very much when it comes to video so I'll upgrade this at some point. For now, though, I'm making cutting costs my main priority. These are the things that I still think I'll need:

  • A TV tuner card
  • A case.
  • A remote control of some kind.
  • A DVD burner.
The DVD burner is the only thing I consider optional currently. For now I'm just going to "borrow" a DVD drive from another PC. Seriously, it's pretty rare that these optical drives are used for much these days.

The TV card must be able to receive DVB-S. DVB-S2, the newer standard which enables HD reception, is not a necessity for me because the broadcasters have no plans to upgrade to it yet. Their current satellite has no DVB-S2 transponders. I could get a second card if I wanted to but this isn't a priority. Most DVB-S cards also have an analogue input and this will do for me to plug in my Pay TV decoder. Sure, the video will be analogue (meaning the CPU will have to do a little work) but at least it should work.

The case will have to be fairly high quality and preferably with optical bays oriented to allow horizontal positioning. I'm not a fan of these expensive $400 "media center" cases you see about the place. I don't need metal, nor fancy lights, nor LCD displays. Just a decent black box.

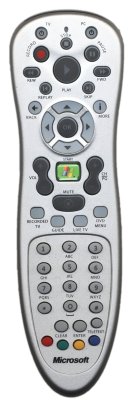
The remote doesn't need too many requirements. However the standard Windows MCE remote should do the trick nicely. Partly this is because it includes IR blasters which allow the PC to change the channel on the Pay TV decoder.

All in all the mythbox should do enough to be useful. My old CPU isn't quite HD video ready probably but given I have practically no hope of getting HD reception this isn't really a concern.

Cheers to fazen for the image. Licensed under CC.

16 February 2008

Acerhk and Ubuntu update


I was looking through the stats today when I discovered that my most popular post is about acerhk and Ubuntu. I'm not surprised in many ways because it was the one thing that caused hell when I was first trying to install it on my laptop. Incidentally, that laptop is still running Ubuntu very nicely (although I'm about to retire it - it's getting a little old).

Anyway, I commented in the first post that I was hoping Ubuntu might one day have acerhk installed by default. Lo and behold this is the case now which significantly simplifies the steps we have to take to get the wireless working. We can skip all the stuff about module assistant and jump straight to configuration.

So skipping the first part of the installation, here's what actually needs doing (quoted from the old post):

---------

We'll need to:

  • Ensure the module is loaded when Ubuntu boots.
  • Tell the acerhk module to enable the wireless both when the laptop is turned on and when it is resumed.
The easiest way to have the module load when Ubuntu loads is to add it to /etc/modules:
sudo sh -c "echo acerhk >> /etc/modules"
Now we're going to make a little script for turning on the wireless. Open up the text editor at Applications > Accessories > Text Editor. Create your script as follows:
#!/bin/bash
echo 1 > /proc/driver/acerhk/wirelessled
Save it into a useful location with an appropriate name. I'm going to name it wifi and save it into my home directory.

Now ensure that the script is executable:
cd ~
chmod +x wifi
Then we need to copy the script to the two locations that will have it being executed on boot and resume.
sudo cp ~/wifi /etc/acpi/resume.d/
sudo cp ~/wifi /etc/init.d/
Finally, activate your startup script with the following command (assuming you are in the same directory as your script):
sudo update-rc.d /etc/init.d/wifi defaults
 Phew! We're done. Reboot the laptop and hopefully your wireless is working!

-----